Backup and Restore
Backup offers the ability for a /root Site Administrator or Configuration Manager to backup the entire content of their current tenant, including Assets, Permissions, Integrations, Logs and sub-Sites. Both Full and Incremental backup options are available depending on requirements.
Conversely, Restore allows the same user role to restore a tenant using a previously created backup file(s).
Backup and Restore Considerations
- Backups are full tenant backups that can only be performed from the tenant's
/rootsite. You cannot backup or restore an individual sub-site or object. - Backup files are stored in a zip archive in a
/backup/<TenantName>folder created in the 12Port installation directory<12Port_Home>, using a naming convention that identifies the time of backup creation. For example, a full backup taken of a tenant named "ProductionOps" performed on October 24, 2024 at 2:38:27 PM will be created at<12Port_Home>/backup/ProductionOps/20241024-143827-full-001.zip.- A Full backup will include the
-fulltype in the filename while an Incremental backup will include the-inctype in the filename.<12Port_Home>/backup/ProductionOps/20241024-143827-full-001.zip<12Port_Home>/backup/ProductionOps/20241025-094108-inc-001.zip
- Large backups may be split into multi-part zip archives where the file name suffix
-00n.zipis the zip part number, with-001.zipindicating the first part of a zip archive. Backup files with a single part will only generate a single file with the-001.zipsuffix. - Each backup volume includes an accompanying signature file (
.sig) used to verify the integrity and authenticity of the backup. The backup list displays the signature status for each backup as Valid, Invalid, or Not Available, providing a clear indication of whether the backup contents can be trusted.
- Backup files are retained indefinitely, unless or until, the source backup file(s) are manually removed from their backup tenant directory.
- Although backup files are relatively small in disk size, we recommend having at least 50 GB of available disk space before you implement a backup routine and to regularly monitor available disk space on the 12Port host server to avoid failures.
- A Full backup will include the
- Restores performed to the same tenant (in-place), the one that was used to create the backup, create objects from the selected backup that are not currently in the tenant and update existing objects. Incremental backups restored in place do not remove objects or revoke permissions that currently exist in the tenant. Objects deleted after the backup was created may be recreated by the restore.
- Restores can be performed to create a new tenant to the same 12Port deployment where it was created ONLY after the original tenant, the one which was used to create the backup, has been deleted.
- Restores can be performed to create a new tenant to a 12Port deployment that is different from the one where the backup file was created.
Note
Although the secure data in the backup is encrypted, please use caution and secure access to these files.
Creating a Backup
From a tenant's /root site, an Administrator or Configuration Manager can perform a backup of this tenant.
Note
Backups can only be configured on the /root site of a tenant and the configured backup includes all sites within this tenant.
- Log in using an Administrator or Configuration Manager account.
- Navigate to Configuration > Backup and select the Backup Type: Full, Incremental or Scheduled.
- Full Backup: creates a backup of all objects in this tenant.
- Incremental Backup: creates a backup of all object changes since the defined Cutoff Date, including newly created objects, updated objects, and deleted objects. You may only select a Cutoff Date that is current day or earlier. The handling of deleted objects during restore depends on whether the backup is restored in place or to another node. If you select a Cutoff Date that is in the future, the Start Backup option will be disabled until this is corrected.
- Scheduled: this option schedules a full backup to run periodically according with the specified schedule. When scheduled, the Schedule parameter will appear where you can use the Scheduler Builder to create your scheduled full backup policy.
After the Schedule has been defined, click the Schedule button to confirm the configuration. If you wish to cancel the scheduled backup, click the Stop Schedule button.
Tip
Schedule the backup operation during off-peak hours, for instance, every Sunday at 1:00 AM—to avoid running it during regular business hours.
-
In the Backup Configuration section:
-
Backup Path: Folder path on the file system to store backup volumes.
The application will add keyword backup and tenant name to the provided path. The path might contain the following keywords:
${HOME}- The root directory where the application is installed on the host system.
${LOCAL-NODE}- The File Storage directory in the local peer node specification.
${TENANT}- tenant name. -
Restore Path: Folder path on the file system to access backup volumes for restore process.
The application will add keyword backup and tenant name to the provided path. The path might contain the following keywords:
${HOME}- The root directory where the application is installed on the host system.
${LOCAL-NODE}- The File Storage directory in the local peer node specification.
${TENANT}- tenant name. -
Scheduled Restore: This switch enables automatic restore from the backup volumes moved to the restore folder's
indirectory.
It supports data transfer scenarios in multi-node deployments, including:- Automated data synchronization between geographically distributed nodes using separate tenant databases
- Disaster Recovery (DR) node maintenance.
When enabled, the application periodically scans theinsubdirectory within the Restore Path folder for newly added signed backup volumes. After verifying their signatures, it initiates the restore process, transferring data from the backup volumes to the tenant database.
Once the restore is complete, the backup volumes are moved to theoutsubdirectory. If an error occurs, they are moved to theerrorsubdirectory instead. In all cases, corresponding audit events are generated and can be viewed in the tenant root site Events report.
-
-
Click the Start Backup button to begin the unscheduled backup operation of this tenant.
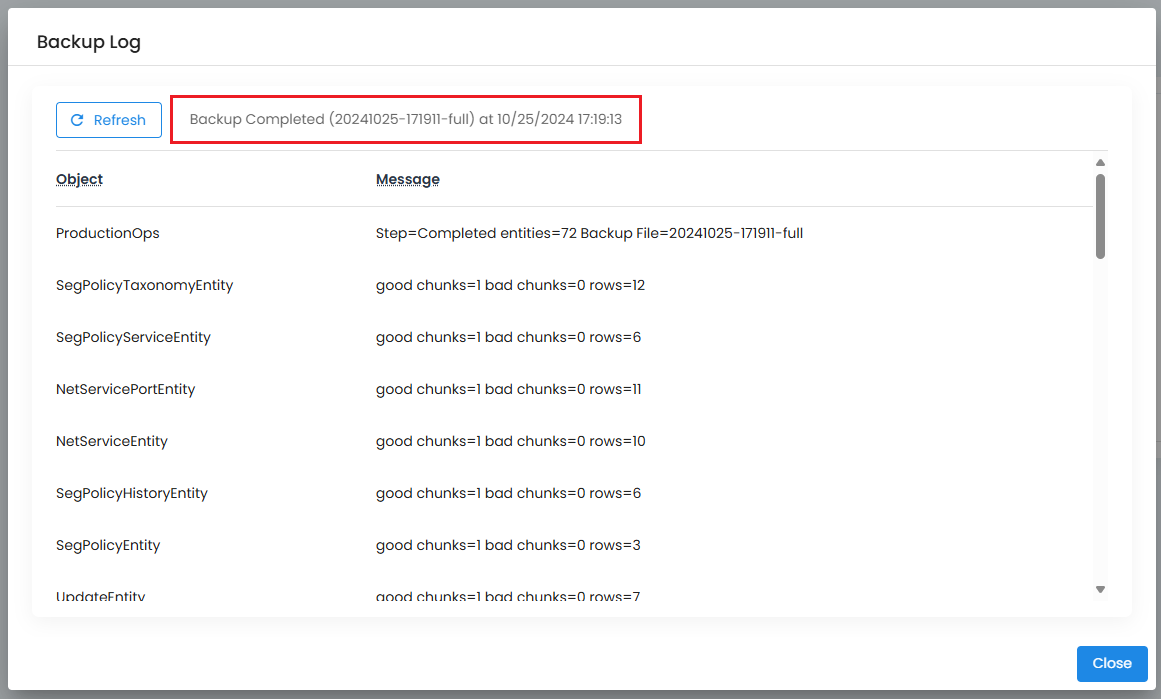
The Backup Log dialog will appear when the backup process begins and will state Backup Completed (<Name>) at <Time> when the backup completes.
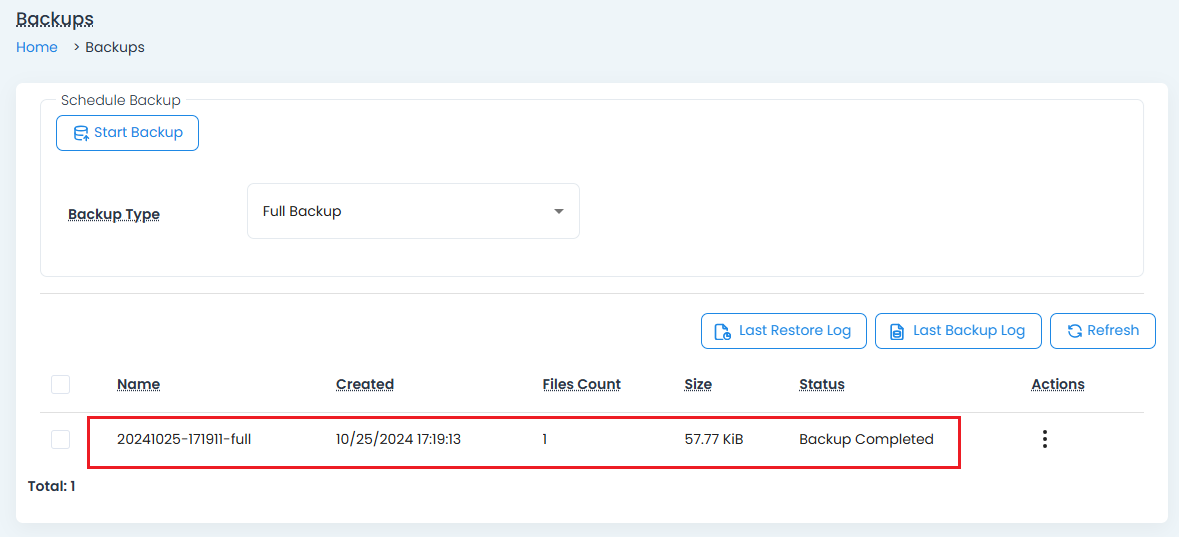
After the backup completes, it will appear in the table list on this page with the display Backup Completed and then can be used for restore operations.
Performing a Restore
Restores are performed by an Administrator or Configuration Manager from the desired starting location. Based on your Restore requirements, refer to the following sections for the procedure.
Restore Behavior for Deleted Objects
The behavior of deleted objects and revoked permissions during a restore depends on the backup type and the target deployment.
- Full backups do not contain information about objects or permissions that were deleted or revoked after the backup was created. Restoring a Full backup does not remove objects or permissions that currently exist in the target tenant. This applies to both in-place restores and restores that create a new tenant. Objects and permissions that existed when the Full backup was created will be restored, including permissions that were later revoked.
- Incremental backups restored in place do not remove objects or revoked permissions from the current tenant. Objects and permissions that were deleted after the Incremental backup was created may be recreated by the restore. Permissions granted after the backup was created are not revoked by the restore. This allows an Incremental backup to be restored in place without removing content or permissions that were created after the backup was taken.
- Incremental backups restored to another node apply information about created, updated, and deleted objects to maintain the target tenant as a copy of the source tenant. This behavior supports data synchronization and Disaster Recovery (DR) node maintenance.
The restore behavior for an Incremental backup is determined by the relationship between the node where the restore is performed and the node that created the backup. Backup files identify their source node, allowing the restore process to determine whether the restore is being performed in place or to another node.
Restoring to the Same Tenant (in-place)
If you want to restore a backup to the same tenant that created it (in-place restore):
- Log in to this tenant with an Administrator or Configuration Manager account.
- Navigate to Configuration > Backup.
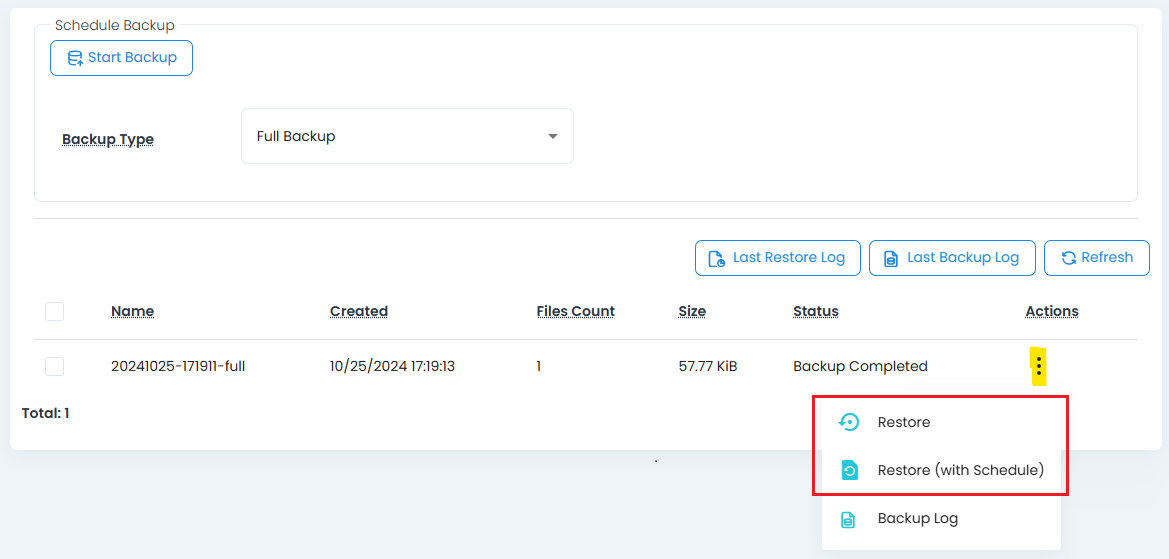
- From the table view of available Backups, locate the backup you wish to restore in-place and from its Actions menu, select the Restore option. Select the Restore (with Schedule) option to include scheduled task execution with the restore operation.
- Click Ok on the confirmation screen to being or Cancel to cancel the operation before it begins.
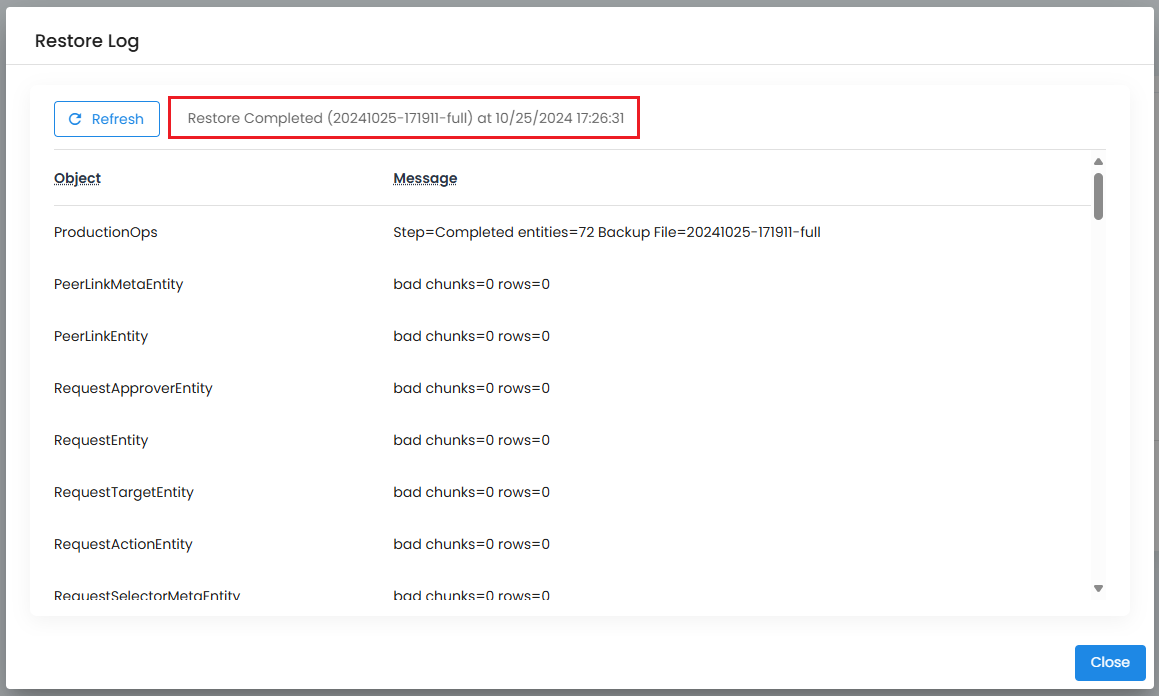
The Restore Log dialog will appear when the restore process begins and will display Restore Completed (<Name>) at <Time> when the restore completes.
Note
An in-place restore will create objects from the backup that are not currently in the tenant and update existing objects with the values from the backup. An Incremental backup restored in place does not remove objects or revoke permissions that currently exist in the tenant. Objects that were deleted after the backup was created may be recreated by the restore. Permissions granted after the backup was created are not revoked.
Restoring to the Same 12Port Deployment (as a new Tenant only)
If you want to restore a backup, as a new tenant, to the same 12Port deployment:
Note
You cannot restore to a new tenant, a backup created from a tenant that currently exists in the same 12Port deployment. The original tenant that created the backup must be deleted first.
The tenant that created the backup must be deleted before this restore operation can begin.
- Log in to the 12Port
/base/roottenant using a Tenant Administrator account. - Navigate to Management > Tenants and for this tenant, use its Actions > Delete option. Proceed with caution as there is not an option to undo this delete operation.
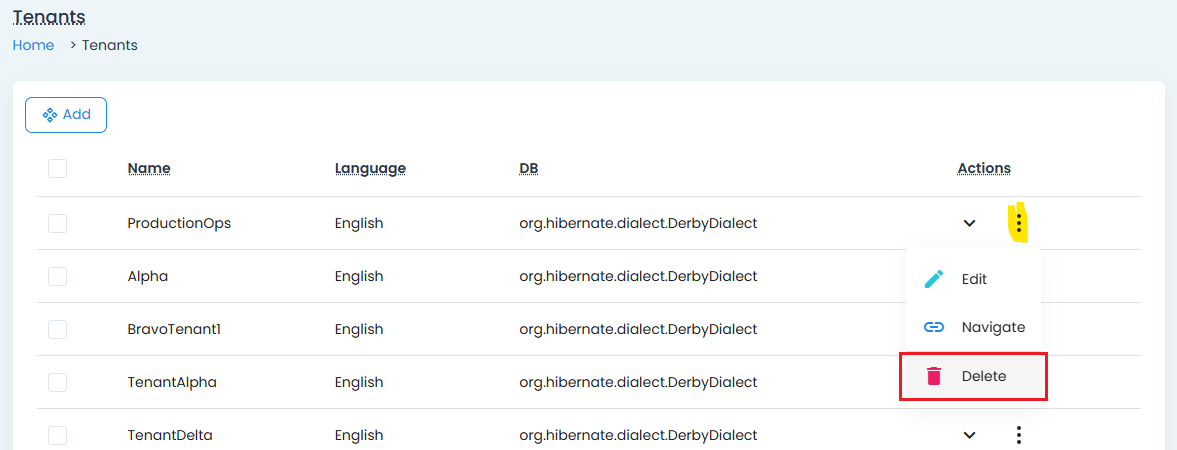
- After the delete operation completes, you must also manually delete the database that was created for this tenant. This may be an embedded or external database.
When the tenant is fully deleted:
- Log in to the 12Port deployment host server and copy the backup files of the tenant the restore operation is being performed with. For example, if we are restoring a tenant with the name "ProductionOps", you will copy the backup files from the directory ProductionOps (e.g.
<12Port_Home>/backup/ProductionOps). Be sure to copy all full backup files (.zip) from that backup date, including the signature files (.sig). - Transfer these backup ProductionOps files to a transfer location on the 12Port deployment where the restore will occur, so the folder target path is
<12Port_Home>/backup/transfer. If the transfer directory does not exist, create it within the /backup directory. - Navigate to Management > Tenants and click the Add button.
- Select the Tenant Update Type of Create From Backup.
- Populate Name, Issuer, Language, Database, and Access Server Port parameters as desired.
- For Backup Tenants, select
transfer. - For Backup, select the Full backup that will be used to restore (create) this new tenant. Full backup names are displayed with the suffix
-full. We do not recommend selecting an incremental backup for this operation, whose name is displayed with the suffix-inc. - In Backup Key, enter the Break Glass Key that was used to create the selected Backup.
- Enable Schedule Tasks (green check) if you want tasks to be scheduled for execution after restore, otherwise tasks scheduled in the backup will not be scheduled to execute after restore.
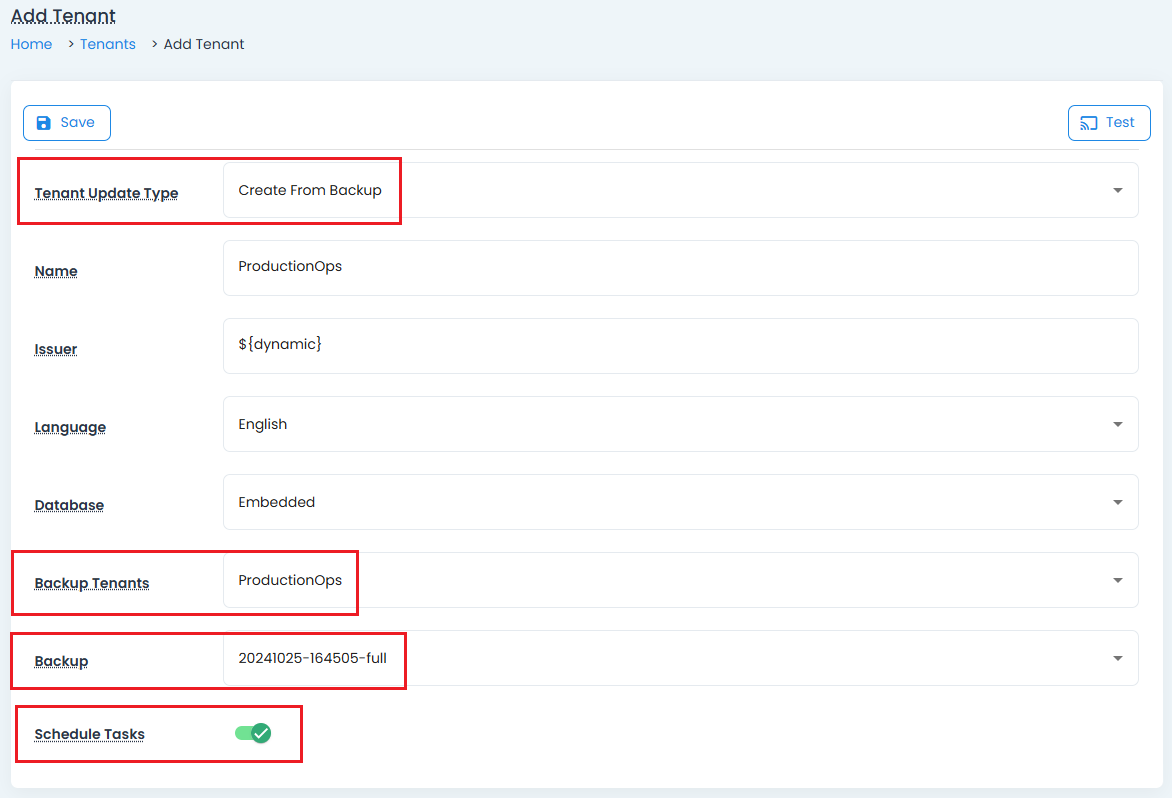
- Click the Save button to begin this restore as a new tenant operation.
The Restore Log will display the message Restore Completed when the restore operation and new tenant creation has finished.
Tip
Once the Full backup that was used to restore (create) this new tenant is complete and the tenant is available, you may then use an available Incremental backup for an in-place restore if required.
Restoring to a Different 12Port Deployment (as a new Tenant only)
If you want to restore a backup, as a new tenant, to a different (target) 12Port deployment from where the backup was created (source):
- Log in to the source 12Port deployment and copy the backup files of the tenant the restore operation is being performed with. For example, if we are restoring a tenant with the name "ProductionOps", you will copy the source backup files from the directory ProductionOps (e.g.
<12Port_Home>/backup/ProductionOps). Be sure to copy all full backup files (.zip) from that backup date, including the signature files (.sig). - Transfer these backup ProductionOps files to a transfer location on the target 12Port deployment where the restore will occur, so the folder target path is
<12Port_Home>/backup/transfer. If the transfer directory does not exist, create it within the /backup directory. - Log in to the target 12Port
/base/roottenant with a Tenant Administrator account. - Navigate to Management > Tenants and click the Add button.
- Select the Tenant Update Type of Create From Backup.
- Populate Name, Issuer, Language, Database, and Access Server Port parameters as desired.
- For Backup Tenants, select
transfer. - For Backup, select the Full backup that will be used to restore (create) this new tenant. Full backup names are displayed with the suffix
-full. We do not recommend selecting an incremental backup for this operation, whose name is displayed with the suffix-inc. - In Backup Key, enter the Break Glass Key that was used to create the selected Backup.
- Enable Schedule Tasks (green check) if you want tasks to be scheduled for execution after restore, otherwise tasks scheduled in the backup will not be scheduled to execute after restore.
- Click the Save button to begin this restore as a new tenant operation.
The Restore Log will display the message Restore Completed when the restore operation and new tenant creation has finished.
After the Restore operation is complete, you should delete the backup files from the <12Port_Home>/backup/transfer directory.
Tip
Once the Full backup that was used to restore (create) this new tenant is complete and the tenant is available, you may then use an available Incremental backup for an in-place restore if required.